I’m participating in Sitecore Hackathon 2020 for the second time. One of the requirement is to have sitecore 9.3 installed on your machine except for commerce . I want to share my experience how i quickly installed Sitecore 9.3 using SIA(Sitecore Install Assistant) in 20 minutes!
Note: No need install any prerequisites(includes Solr) manually, SIA will take care of it.
Preparation:
Download installation package (Graphical setup package XP Single) from here.
Installation:
Extract the file zip file downloaded and click on Setup.exe
Install the prerequisites if needed.
Install Solr 811 by filling Port, Windows service path prefix and Install path and Install.
Note:Make sure the port number is different from earlier versions of Solr installed.
Fill out site prefix, admin password(going with b, so easy to remember) and license file path.
Fill out SQL server instance name, admin username and password.
Fill out the Solr URL, System root and Windows service name
Note:Go to Solr URL to make sure it’s running successfully.
Select optional module SXAif you need. I’m going for it, time to explore SXA! Would be nice if Horizon is listed here.
Review the summary to make sure the settings are correct.
SIA validates to make sure the files look good.
Install. This takes around 10 minutes (you can get a coffee!). If it errors out, check out the log.
Yayy!! It’s installed. Is it easy to install with SIA? It’s indeed a great tool!
Check out the release notes for what’s new in Sitecore 9.3 here
2019 is going great so far, wanted to share my contributions to the Sitecore community(Awesome!).
Presented Sitecore 9 Forms(Intermediate/Advance) in 7 SUG’s-
• April 18 2019 – SUG Bulgaria • May 4 2019 – SUG Bangalore • June 4 2019 – SUG Manchestor, NH • June 6 2019 – SUG Belarus • June 12 2019 – SUG Boston • June 25 2019 – SUG NCR(Delhi -India) • Aug 29 2019 – SUG Educador
The blog posts I have written and one of my blog post received ‘You are life saver, Thank you’ comment.
• Install Sitecore 9.1 quickly in 5 easy steps • Sitecore 9 Forms: Redirecting to formbuilder on Submit? • Sitecore 9 Forms: The required anti-forgery cookie __requestVerificationToken is not present • Sitecore license file expired? • Sitecore 9.1 Forms: Conditional Logic • Sitecore 9 Forms: Custom Control – Conditional Section • Sitecore 9 Forms: Success message • Sitecore 9 Forms: Custom Submit Action • Tips and Tricks : GIT Cherry Pick • Sitecore Certification : Exam and Review • Sitecore 9 Forms: Save Data • Sitecore 9 Forms: Custom Regex Validation • Sitecore 9 Forms: Custom Grouped dropdown • Sitecore 9 Forms: Uncaught TypeError: Cannot read property ‘unobtrusive’ of undefined • XConnect: Certificate was not found • Sitecore 9 Forms: Access landing page fields in FormSubmitContext? • Sitecore 9 Forms: The date range is invalid. Please select a date range that is within the range of the list. • Sitecore Forms: Export Data to CSV shows Field Types on column header? • Sitecore Forms: Redirecting to External URL
Youtube • How to add Forms Custom Submit Actions – https://www.youtube.com/watch?v=wE_aaFN7GvY
I came across a scenario where I need to redirect to a external url(thank you page) after form submission. It’s achievable using formSubmitContext’s RedirectUrl property on your Custom Submit Action.
Here is the code snippet –
protected override bool Execute(string data, FormSubmitContext formSubmitContext)
		{
//Prepare model
//WebApi Call

//Redirect to external URL
var thankYouPageUrl = $"{HttpContext.Current.Request.Url?.Scheme}://{HttpContext.Current.Request.Url?.Host}/[thank-you-page-path]/";

formSubmitContext.RedirectUrl = $"{thankYouPageUrl}?id={add-any-querystring-if-needed}";
formSubmitContext.RedirectOnSuccess = true;
return true;

}
I deployed the forms to Staging environment and see how the forms were performing.
I exported the data using Export form data into CSV button and i received ‘The date range is invalid. Please select a date range that is within the range of the list.‘ error.
I tried different range and it threw the same error. I checked the db([project]. ExperienceForms) and there was NO DATA!
I submitted the form and tried again. It downloaded the CSV file with an entry on it.
I came across a scenario where I needed to access landing page fields(the page where we add Forms) in Custom Submit Action’s FormSubmitContext.
By default, the page item isn’t known at the Submit Action. So started thinking should i create a custom hidden field or use the Forms Extensions module? At the end of the day, i didn’t need either.
Here is the quick way to access the current page using HttpContext’s AbsolutePath.
protected override bool Execute(string data, FormSubmitContext formSubmitContext)
{

var contextItem = GetContextItem.GetItem(HttpContext.Current.Request.UrlReferrer?.AbsolutePath) as ILandingPageContentItem;

// Access fields from ContextItem
}

public class GetContextItem
{
	public static IStandardTemplateItem GetItem(string path)
	{
		Item item = Sitecore.Context.Database.GetItem($"/sitecore/content/<tenant>/Home{path}");

		return item?.AsStronglyTyped();
	}
}
Hope this helps someone. Any questions, please leave a comment.
Experience Analytics was not working in the Production Azure PaaS environment. I checked the logs and it was throwing Certificate was not found error.
Exception: System.InvalidOperationExceptionMessage: The certificate was not found.Source: Sitecore.Xdb.Common.Webat Sitecore.Xdb.Common.Web.CertificateWebRequestHandlerModifier.Process(HttpClientHandler handler)at Sitecore.Xdb.Common.Web.CommonWebApiClient`1.CreateRequestHandler()at Sitecore.Xdb.Common.Web.CommonWebApiClient`1.CreateClient()at System.Lazy`1.CreateValue()at System.Lazy`1.LazyInitValue()at Sitecore.Xdb.Common.Web.CommonWebApiClient`1.<ExecuteAsync>d__37.MoveNext()--- End of stack trace from previous location where exception was thrown ---at System.Runtime.ExceptionServices.ExceptionDispatchInfo.Throw()at System.Runtime.CompilerServices.TaskAwaiter.HandleNonSuccessAndDebuggerNotification(Task task)at Sitecore.Xdb.Common.Web.CommonWebApiClient`1.<ExecuteGetAsync>d__32.MoveNext()--- End of stack trace from previous location where exception was thrown ---at System.Runtime.ExceptionServices.ExceptionDispatchInfo.Throw()at System.Runtime.CompilerServices.TaskAwaiter.HandleNonSuccessAndDebuggerNotification(Task task)at Sitecore.XConnect.Client.WebApi.ConfigurationWebApiClient.<Refresh>d__4.MoveNext()
My first guess was certificate would have expired, but it was valid.
Second guess was thumbprint could be wrong, but thumbprint was perfectly matching with the config value(\App_Config\AppSettings.config file , in the validateCertificateThumbprint setting).
Started wondering why it can’t find the certificate for some reason? Came to know that need to add an application setting to the web app called WEBSITE_LOAD_CERTIFICATES and the value needs to be the certificate thumbprint.
This application setting is required for the app service to load the certificate into the local certificate store of the host running the app service.
Once the setting is added and I no longer see the error in logs and the Experience Analytics started showing some number/graphs. Yay!
Hope this helps. Any questions, please leave a comment.
I came across a scenario to implement Conditional Section for Sitecore 9.0 to hide/show fields based on user input. This feature was introduced on Sitecore 9.1(Checkout my other blog here). Since the project is in Sitecore 9.0, I decided to create a custom control using speak.
Let’s get started.
Step 1: Create form element in core DB using speak
Switch to Core DB
Go to /sitecore/client/Applications/FormsBuilder/Components/Layouts/PropertyGridForm/PageSettings/Settings
Create a template based of Form Parameters. (I couldn’t find it when i tried from Insert Template, so i duplicated the existed one- MutliLine Text. If you know, how to add Form Parameters template(not using Sitecore Rocks), please leave a comment.)
Add the FormTextBox Parameters template. Since I duplicated MultiLineText field, it came with the Details, Validation, Styling and Advanced. I feel it’s best shortcut to create quick.
Fill out FormLabel, IsLableOnTop and BindingConfiguration fields.
Repeat the fields as many as you need. Here i added one more to compare the value.
NOTE: IsLabelOnTop is unchecked for additional fields
Step 2: Create form template in Master DB
On Master DB, create a custom template under Basic/Lists/Security/Structure folders based on Field Type template(/sitecore/templates/System/Forms/Field Type). I created under Structure Section as it’s Condition Section.
Fill out Property Editor field by choosing the custom control that was created in Core DB. You can see all the fields listed shown in below screen shot.
Fields(View Path, Model Type)will be filled out after creating code behind and razor view files.
Step 3: Create model and view in Visual Studio
Create model and view in project under Helix structure
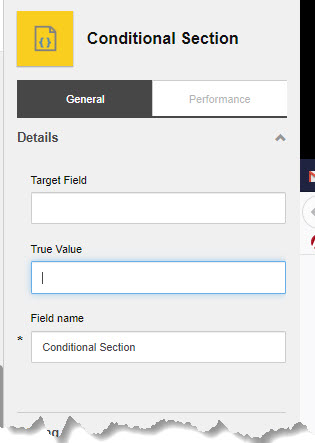
Now you should see the new form control on the elements panel. Drag and Drop to any form and fill out the Target Field and True Value fields appropriately and put any element(s) inside Conditional Section to show/hide the element(s).
Don’t forget to publish all the templates and forms!
Happy Sitecoring! Leave a comment if you have any questions.
Are you getting this error on Sitecore 9 Forms Submission? I got it and it took me some time to figure out. It’s all related to Validation. Here are the points to check to narrow down the issue —
If you have form fields set it to mandatory, change it to optional and see if that makes the submission successful. If so, one of the field validation is causing trouble.
It happens for custom form control quite often, where you need add the validation to razor view file and make sure you have this attribute – GenerateUnobtrusiveValidationAttributes.
Compare your custom control razor file to any one of inbuilt form controls ([iis-site-folder]\Views\FormBuilder\FieldTemplates ) like below and if you see any difference on attributes, add it out.
Finally a simple check: make sure to publish all the forms and view the landing page in live mode(not in preview mode)