Category: Optimizely

Unlock AI-Ready Experiences with Optimizely

Over the past few months, almost every customer conversation has shifted from SEO to AI readiness.

The questions are no longer just:

“How do we rank higher on Google?”

They’re becoming:

“How do we make sure ChatGPT, Copilot, Gemini, or Claude can find and understand our content?”

If you’re running an Optimizely website, the good news is that you don’t need a complete redesign. A few small improvements can make your content much easier for AI systems to discover and consume.

In this post, I’ll walk through a few simple changes we’ve been discussing with customers, including:

  • Upgrading the Stott Security RobotHandler
  • Adding an llms.txt file
  • Structuring content for AI
  • Improving metadata
  • Preparing your Optimizely implementation for the next generation of search

Why AI Readiness Matters

Search engines return links.

LLMs return answers.

That means AI systems need to understand your content, not just crawl it.

If your website has:

  • messy content
  • outdated metadata
  • poor internal linking
  • no structured information

then AI assistants have a harder time understanding what your organization actually offers.

Fortunately, most of these improvements are things we should already be doing.

Step 1 – Upgrade Stott Security RobotHandler

We are currently using Stott.Security.Optimizely.RobotsHandler 3.x – CMS PaaS 12 

There isn’t necessarily anything wrong with version 3, but if you’re actively maintaining your solution, it’s worth upgrading to the latest release to benefit from ongoing fixes, compatibility improvements, and newer Optimizely support.

Updating is straightforward.

Remove the old package:

dotnet remove package Stott.Security.Optimizely.RobotsHandler

Install the latest version:

dotnet add package Stott.Security.Optimizely.RobotsHandler

After upgrading, verify that:

  • robots.txt is still generated correctly
  • your sitemap is referenced
  • custom rules still work
  • different environments behave as expected

It only takes a few minutes but keeps an important part of your site’s crawl configuration up to date.

Step 2 – Add an llms.txt File

You have probably heard about llms.txt recently.

Think of it as the AI equivalent of a sitemap.

While it isn’t an official web standard today, more organizations are publishing one to help AI systems discover their most important content.

A simple example looks like this:

# Contoso

Website:
https://contoso.com

Documentation:
https://contoso.com/docs

Products:
https://contoso.com/products

Support:
https://contoso.com/support
 

For smaller websites, a static file is perfectly fine.

For enterprise Optimizely implementations with thousands of pages, I’d recommend generating it dynamically so it always reflects your published content.

That’s something I’ll cover in a future post.

Step 3 – Structure Your Content

This is probably the biggest opportunity.

Many websites still publish pages that contain multiple unrelated topics, huge blocks of text, and headings like:

Learn More

AI models love structure.

Instead, organize pages with:

  • meaningful headings
  • summaries
  • FAQs
  • bullet lists
  • tables where appropriate

Good content structure helps humans and AI alike.

Step 4 – Don’t Ignore Metadata

Metadata is still important.

Make sure every page includes:

  • Page title
  • Meta description
  • Canonical URL
  • Open Graph tags
  • Schema.org structured data

Structured data gives AI additional context about your pages, products, articles, events, and organization.

Step 5 – Review Your Sitemap

Your XML sitemap should always be current.

Remove:

  • unpublished pages
  • redirects
  • expired content

Include:

  • important landing pages
  • articles
  • product pages
  • documentation

This benefits traditional search engines and AI crawlers alike.

Step 6 – Improve Internal Linking

One thing that’s often overlooked is internal linking.

If every page exists in isolation, AI has to work harder to understand the relationships between your content.

Instead, connect related pages naturally.

For example:

  • Blog → Product
  • Product → Documentation
  • Documentation → FAQ
  • FAQ → Support

These relationships help both users and AI navigate your website more effectively.

Step 7 – Expose Content Through APIs

If you’re building AI-powered experiences, don’t stop with web pages.

Optimizely already provides excellent options for exposing structured content, including:

  • Content Delivery API
  • Content Graph
  • Search & Navigation indexes

These services make it much easier to build Retrieval-Augmented Generation (RAG) applications and AI assistants that provide grounded responses based on your content.

Most of these are relatively small changes, but together they make your content significantly easier for AI systems to understand and surface.

As AI continues to change how people discover information, preparing your Optimizely website today will put you in a much stronger position tomorrow.

Happy Optimizing!

0

Optimizely: Upgrade Opti-ID and .NET 10 in CMS 12

Many Optimizely customers are planning their roadmap around a future migration to Optimizely CMS 13. As a result, upgrades such as Opti ID adoption and .NET modernization are often postponed until the CMS 13 project begins.

However, waiting for CMS 13 is not necessary.

Organizations running Optimizely CMS 12 can upgrade to Opti ID and move to .NET 10 today, gaining immediate security, performance, and operational benefits while reducing the complexity of a future CMS 13 migration.

Why Modernize on CMS 12?

Instead of combining multiple transformations into a single CMS 13 project, organizations can:

  • Improve security immediately
  • Standardize authentication
  • Modernize the application platform
  • Reduce future migration complexity
  • Enable newer Optimizely SaaS capabilities

A phased modernization approach is typically lower risk than a large-scale platform upgrade.

Part 1: Implementing Opti ID in CMS 12

What is Opti ID?

Opti ID is Optimizely’s centralized authentication platform that provides:

  • Single Sign-On (SSO)
  • Multi-Factor Authentication (MFA)
  • Centralized user administration
  • Unified access across Optimizely products
  • Improved security and compliance

Required NuGet Packages

Depending on your CMS 12 version, install or upgrade the following packages.

Core CMS Packages

Install-Package EPiServer.CMS
Install-Package EPiServer.CMS.AspNetCore
Install-Package EPiServer.CMS.UI

Identity Packages

Install-Package EPiServer.CMS.UI.AspNetIdentity
Install-Package Microsoft.AspNetCore.Authentication.OpenIdConnect
Install-Package Microsoft.Identity.Web

Always align package versions with the Optimizely-supported package matrix for your CMS version.

Step 1: Enable Opti ID in Optimizely

Within the Optimizely Admin Portal:

  1. Navigate to Administration
  2. Enable Opti ID
  3. Configure organization users
  4. Assign product access
  5. Configure MFA policies

Step 2: Configure Authentication

Update Program.cs.

Add Authentication Services

builder.Services
.AddAuthentication(options =>
{
options.DefaultScheme = CookieAuthenticationDefaults.AuthenticationScheme;
options.DefaultChallengeScheme = OpenIdConnectDefaults.AuthenticationScheme;
})
.AddCookie()
.AddOpenIdConnect(options =>
{
options.Authority = configuration["Authentication:Authority"];
options.ClientId = configuration["Authentication:ClientId"];
options.ClientSecret = configuration["Authentication:ClientSecret"];

options.ResponseType = "code";

options.SaveTokens = true;
});
 

Step 3: Configure appsettings.json

{
"Authentication": {
"Authority": "https://login.optimizely.com",
"ClientId": "xxxxx",
"ClientSecret": "xxxxx"
}
}

Step 4: Configure Authorization

Map Opti ID users to CMS roles.

Example:

services.AddAuthorization(options =>
{
options.AddPolicy("CmsEditors",
policy => policy.RequireRole("WebEditors"));
});
Validate:
  • WebEditors
  • Administrators
  • ContentApprovers
  • MarketingUsers

Part 2: Upgrading CMS 12 to .NET 10

Why Upgrade?

Benefits include:

  • Improved performance
  • Better security
  • Long-term support alignment
  • Reduced technical debt
  • Better cloud-native capabilities

Step 1: Upgrade Development Environment

Install:

  • .NET 10 SDK
  • Visual Studio 2026 (or latest supported version)

Step 2: Update Project Files

Update:

<TargetFramework>net10.0</TargetFramework>

Step 3: Upgrade NuGet Packages

CMS Packages

<PackageReference Include="EPiServer.CMS.Core" Version="12.24.0" />
<PackageReference Include="EPiServer.CMS.UI" Version="12.34.4" />

Microsoft Packages  

<PackageReference Include="Microsoft.Extensions.*" />
<PackageReference Include="Microsoft.AspNetCore.*" />
<PackageReference Include="Microsoft.Identity.Web" />

Hope this helps.

Happy Optimizing!
0

Optimizely CMS 13 Upgrade Overview

Wondering how to upgrade from Optimizely CMS 12 to 13? Not sure where to start – you are not alone. 

Here is a quick overview of the key architectural changes that need to be addressed.

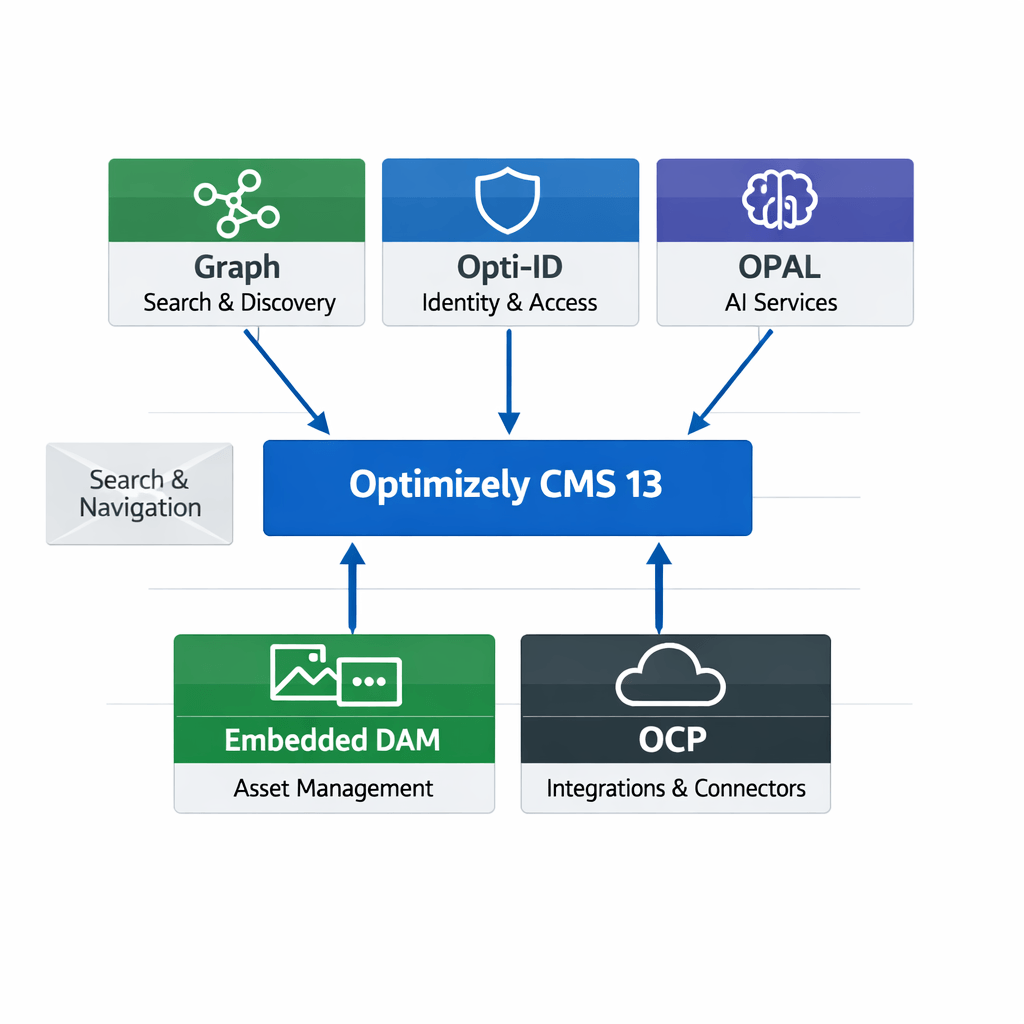
Key Architecture Changes

  1. No Search and Navigation
  2. Opti-ID for Identity
  3. Graph for Search and Discovery
  4.  Embedded DAM
  5. OCP for Integrations
  6. OPAL for AI

Optimizely CMS 13


🟩Graph — Search & Discovery

  • Provides unified content search across structured and unstructured data.

  • Enables semantic relationships between content items.

  • Powers personalized discovery experiences through relevance scoring and taxonomy mapping.

  • Integrates with Optimizely’s indexing layer for fast retrieval and filtering.

🟦Opti‑ID — Identity & Access

  • Centralized identity provider for user authentication and authorization.

  • Supports SSO, OAuth 2.0, and enterprise federation (e.g., Azure AD, Okta).

  • Manages user roles, permissions, and attribute mapping across CMS modules.

  • Ensures secure access control for editors, marketers, and external systems.

🟪OPAL — AI Services

  • Provides AI‑driven content recommendations and predictive analytics.

  • Automates tagging, summarization, and personalization workflows.

  • Integrates with external AI APIs for language and vision tasks.

  • Enhances editorial efficiency through intelligent suggestions and insights.

🟩Embedded DAM — Asset Management

  • Manages digital assets (images, videos, documents) directly within CMS.

  • Supports versioning, metadata tagging, and rights management.

  • Enables seamless asset reuse across pages and campaigns.

  • Connects to external storage or CDN for optimized delivery.

⬛OCP — Integrations & Connectors

  • Provides an integration framework for third‑party systems (CRM, ERP, marketing tools).

  • Uses REST APIs and webhooks for data synchronization.

  • Supports modular connectors for commerce, analytics, and automation.

  • Ensures scalable interoperability across enterprise ecosystems.

Hope this helps.

Happy Optimizing!


0

Optimizely Opal: Unlocking AI-Powered Marketing with Opal Chat & Agents

I’ve just released a new YouTube video highlighting Optimizely Opal and how it’s transforming modern marketing with AI-powered chat and intelligent agents.

In this video, you’ll get a quick overview of:

  • Opal Chat and how it simplifies everyday marketing tasks
  • AI agents that help generate content, insights, and reports
  • How Opal enables faster, smarter marketing workflows

Check out the video here –

Happy Optimizing!


0

Optimizely: Our Journey in the Opal Innovation Challenge

When we signed up for Optimizely’s Opal Innovation Challenge, we knew it wasn’t just about building a solution—it was about solving a real marketing pain point. As marketing professionals and technologists, we’ve seen countless campaigns fail despite being well-written. Why? Because they didn’t resonate with the audience. This challenge gave us the perfect opportunity to tackle that problem head-on.

https://www.optimizely.com/operation-opal/#challenge

The Spark Behind the Idea

Marketing teams often struggle with persona alignment. A campaign might sound great internally, but fall flat with the target audience. For example:

  • Campaign 1: “Save more with Smart meters” – casual tone, generic message.
  • Campaign 2: “Embracing Green Living” – empathetic, informative, and resonates better.

This gap between content creation and audience expectation inspired our solution.

Our Team & Approach

We formed Infosys Transformers, a two-member team:

Our goal was simple yet ambitious: Make every piece of content count.

Challenges We Faced

  • Time Constraints: Building a multi-agent workflow in a hackathon timeframe was intense.
  • Balancing Creativity & Tech: Ensuring the solution was both innovative and practical.
  • Persona Complexity: Defining measurable persona attributes for scoring was tricky.

Timelines

Key Lessons Learned

  1. Persona Alignment is Non-Negotiable: Content without persona context is just noise.
  2. AI Can Bridge the Gap: Multi-agent systems can automate what manual reviews can’t.
  3. Collaboration is Everything: Combining tech and marketing expertise was our biggest strength.
  4. Start Simple, Scale Later: A modular approach helped us deliver a working prototype fast.

The Hackathon Experience

The Opal Innovation Challenge wasn’t just a competition—it was a learning marathon. We explored Opal’s agent ecosystem, experimented with orchestration, and realized how AI can transform marketing workflows.

Check out our video presented at the Hackathon – 


Closing Thoughts

Innovation happens when you combine empathy with technology. For us, this challenge was proof that marketing and AI are not separate worlds—they’re partners in creating meaningful experiences.

Top teams can win prizes like $5,000 in MDF, gift cards, and thought leadership opportunities.

Hope this helps.

Happy Optimizing!

0

Optimizely : Show Personalized Content Blocks

I have been exploring Personalization on Optimizely CMS 12 – Simple to set up, and can be utilized throughout the website.

I came across this use case where we want to show the Priority Call button on a page only during business hours.

The page currently has no call-to-action button.

Let’s get started to personalize the page to add a Priority Call button.

Step 1: Create Audience

  • Create an audience with the rules you would like to define.

Optimizely-CMS-Personalization-Content-Block.png

  • I created an Audience called Priority Call specifically for customers who can call the priority phone number during business hours.

Optimizely-CMS-Personalization-Content-Block-1.png

  • Add Criteria based on the project needs – multiple criteria can target specific customers.

  • Added Time of Day criteria – Monday to Friday from 8 am to 5 pm.

Optimizely-CMS-Personalization-Content-Block-3.png


Step 2: Create a Personalized Block

  • Now that we have created the target Audience. Let’s make a personalized block for a page.
  • I chose the ‘Find a Reseller’ page and, in Blocks, I am going to create a New Block for this page – you can also create one for the All Sites.

  •  Selected Button as the New Block and gave it a name – Priority Call Button.

  • Filled out the Button Text and Link.

  • Please make sure to Publish the Block – If not, it will not be visible on the page. 
  • I have made this mistake and wondered why the block isn’t appearing 🙂


3. Add the Personalized Block to a Page

  • Let’s drag and drop the Priority Call Button block into the Large Content Area or any Content Area.

  • Let’s personalize the button.

  • Everyone is by default – let’s change it to our new audience Priority Call.

  • Let’s publish the page and view it during business hours (our Audience criteria)
  • Yay! We could see the Priority Call Button!

If you prefer watching a video, my quick recording –

Hope this helps.

Happy Optimizing!

0

Optimizely PaaS Administrator Certification : Free for Everyone

Optimizely has recently launched a free PaaS Administrator Certification.

https://academy.optimizely.com/student/activity/2958208-paas-cms-administrator-certification?sid=a5b1a937-c694-4e99-b753-821bac3d9173&sid_i=0


Exam Details:

  • Questions: 50
  • Duration: 60 minutes
  • Passing Score: 80%

In case of failure, you can retake the exam after 24 hours.

  • After passing the exam, Credly will send an email with badge details.
  • Good Luck!

Hope this helps.

Happy Optimizing!

0

Automating Cleanup Tasks with Optimizely Scheduled Jobs

Scheduled jobs in Optimizely CMS are a powerful way to automate any background tasks like content cleanup, indexing, or reporting.

I created a simple scheduled job to delete the expired content.

Let’s get started.

Step 1: Create the Job Class

  • Created a job called ExpiredPagesCleanupJob.cs that inherits the ScheduledJobBase class.
  • Implement logger as needed, currently commented out in code.
  • Rebuild and deploy the solution.

Step 2: Run the job

  • Wondering, don’t I need to register the job in Optimizely CMS? No need, it automatically registers the job using the [ScheduledPlugin] attribute.

Optimizely-CMS-Scheduled-Job-1.png

  • Let’s navigate to Settings -> Scheduled Jobs
  • Now you will see the job listed and ready to be started.

Optimizely-CMS-Scheduled-Job-2.png

  • Let’s start the job manually for now.

Optimizely-CMS-Scheduled-Job-3.png

  • History shows whether the job has succeeded or not.

Optimizely-CMS-Scheduled-Job-4.png

  • Before running the job, the Expired Page report showed that two content pages had expired.

Optimizely-CMS-Scheduled-Job-5.png

  • Now let’s check the reporting results again. yay! It’s successfully deleted!

  • You can schedule the job every 5 seconds, minutes, hourly, and so on.

If you prefer watching a video, my quick recording –

Hope this helps.

Happy Optimizing!

0

Multiple Languages in Optimizely CMS

I was exploring multi-languages in Optimizely CMS 12 – able to figure it out quickly in a few steps.

Let’s get started.

1. Enable Languages in the Admin

Optimizely stores language settings in the Admin view.

  • Log in to Optimizely CMS as an administrator.

  • Navigate to: Admin -> Manage Website Languages

  • You can select an existing language or add a new language

    • There are 14 languages available by default.

Optimizely-CMS-Multi-Language-1.png

    • Add a new language if it’s not listed in the default list.

      • I’m adding Hindi (hi-IN) as I’m from India 🙂

Optimizely-CMS-Multi-Language-2.png

  • Make sure to Enable the Language to be listed on the sites.


2. Language Settings

  • Now the Hindi is listed on Sites, but it’s enabled at the site level.

Optimizely-CMS-Multi-Language-4.png

  • To enable at the site level, go to Language Settings under Tools (Make sure you are on the site’s Start page).

Optimizely-CMS-Multi-Language-5.png

  • Check the newly added language under Available Languages.

Optimizely-CMS-Multi-Language-6.png

  • We need to set the Fallback Languages as a secondary option when the language is not available.

Optimizely-CMS-Multi-Language-7.png


3. Update Page Types and Block Types

To support multilingual fields, Optimizely requires culture-specific properties.

  • For any property that should be translated, add the attribute:

[CultureSpecific]

Optimizely-CMS-Multi-Language-8.png

  • Rebuild and deploy the solution.


4. Create Translations

  • Select the page you would like to translate, and the Translate button will appear. I chose the Contact Us page for demo purposes.

Optimizely-CMS-Multi-Language-9.png

  • Create the language version.

Optimizely-CMS-Multi-Language-10.png

  • Translate properties, blocks, and media as needed and publish the changes.

Optimizely-CMS-Multi-Language-11.png

  • Let’s preview the changes. Isn’t looking good?

Optimizely-CMS-Multi-Language-11.png

If you prefer watching a video, my quick recording –

Hope it helps.

Happy Optimizing!

0

Optimizely: Multi-Step Form Creation Through Submission

I have been exploring Optimizely Forms recently and created a multi-step Customer Support Request Form with File Upload Functionality. 

Let’s get started.

Note: Assuming that you have installed the Forms module. If not, please check out my blog post – 

https://madhuanbalagan.com/optimizely-forms-setup-configuration-and-submission

Creation of Multi-Step Form

  • Create a new Form Container in the Forms Tab – named it Customer Support Form.

Optimizely-Multi-Step-Forms-Step-Form-NuGet-Install-Submission.png


Step 1: Contact Details

  • Let’s create the first step by dragging and dropping the Form Step in the Content Area.

Optimizely-Multi-Step-Forms-Step-Form-NuGet-Install-Submission-1.png

  • Quick Edit to fill the Title, Description, and publish the changes.

Optimizely-Multi-Step-Forms-Step-Form-NuGet-Install-Submission-2.png

  • Inside the Form Step 1 – Drag and drop the Text elements for the following fields.
    • Name
    • Email
    • Phone

Note: Publish each field to reflect on the Content Area.

Optimizely-Multi-Step-Forms-Step-Form-NuGet-Install-Submission-3.png

Step 2:  Product Details

  • Let’s drag and drop the Form Step element like before, and the following fields.
    • Product ID
    • Purchase Date
    • Warranty Status
  • Product ID – Created as a Number and checked all validators.

Optimizely-Multi-Step-Forms-Step-Form-NuGet-Install-Submission-4.png

  • Purchase Date – Text field with Date Format validation.

Optimizely-Multi-Step-Forms-Step-Form-NuGet-Install-Submission-5.png

  • The Step 2 form is ready now.

Optimizely-Multi-Step-Forms-Step-Form-NuGet-Install-Submission-6.png

Step 3:  Issue Description

  • Let’s drag and drop the Form Step element like before, and the following fields.
    • Issue Type
    • Issue Description
    • File Upload
    • Submit button
  • Issue Type – Selection element options entered manually – could be a datasource as well.

Optimizely-Multi-Step-Forms-Step-Form-NuGet-Install-Submission-7.png

  • File Upload – Set the Max Limit and Allowed extensions separated by a comma.

Optimizely-Multi-Step-Forms-Step-Form-NuGet-Install-Submission-7.png

  • The Step 3 part is completed and ready to be placed in a landing page.

Optimizely-Multi-Step-Forms-Step-Form-NuGet-Install-Submission-9.png

Form in Landing Page:

  • Create a new Standard Page – Customer Support Page.
  • Drag and drop the newly created Form into the Content Area.
  • Publish the changes.

Optimizely-Multi-Step-Forms-Step-Form-NuGet-Install-Submission-10.png

Testing the Form:

  • The new landing page shows in the menu – let’s check it out.

Optimizely-Multi-Step-Forms-Step-Form-NuGet-Install-Submission-11.png

Optimizely-Multi-Step-Forms-Step-Form-NuGet-Install-Submission-11.png

  • The File Upload – multiple file selection worked great!

Optimizely-Multi-Step-Forms-Step-Form-NuGet-Install-Submission-13.png

  • Let’s submit the form – you could redirect to a specific page if needed.

Optimizely-Multi-Step-Forms-Step-Form-NuGet-Install-Submission-14.png

Form Submissions:

  • The submitted records are easy to check by pressing the Form Submissions.

Optimizely-Multi-Step-Forms-Step-Form-NuGet-Install-Submission-15.png

  • The records can be exported in any of the following formats. 

  • The records are stored forever by default – feel free to change the retention policy as needed for partial and full submissions.

Optimizely-Multi-Step-Forms-Step-Form-NuGet-Install-Submission-17.png

If you prefer watching a video, my quick recording –

Hope this helps.

Happy Optimizing!

0