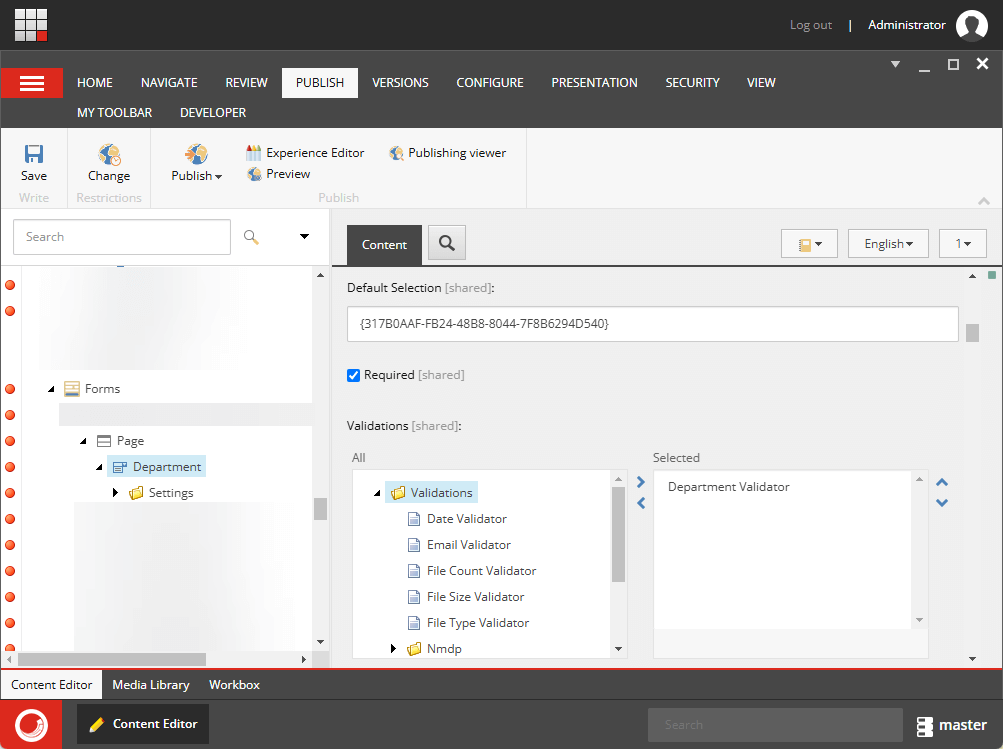
I came across a scenario where I needed to exclude the default value for dropdowns in Sitecore Forms. By default, dropdown fields in Sitecore Forms often preselect the first option, which might be a placeholder like “Select an option.”
If users submit the form without changing this value, it can lead to unreliable data. Custom validation helps enforce user interaction, ensuring the selection is meaningful.
Steps to Implement Custom Validation in Sitecore Forms
Step 1: Create a Custom Validator
Navigate to your Sitecore solution and open the project where Sitecore Forms is configured.
Create a new class that extends FormConditionalValidatorand override the validation logic.
Step 2: Register the Validator in Sitecore
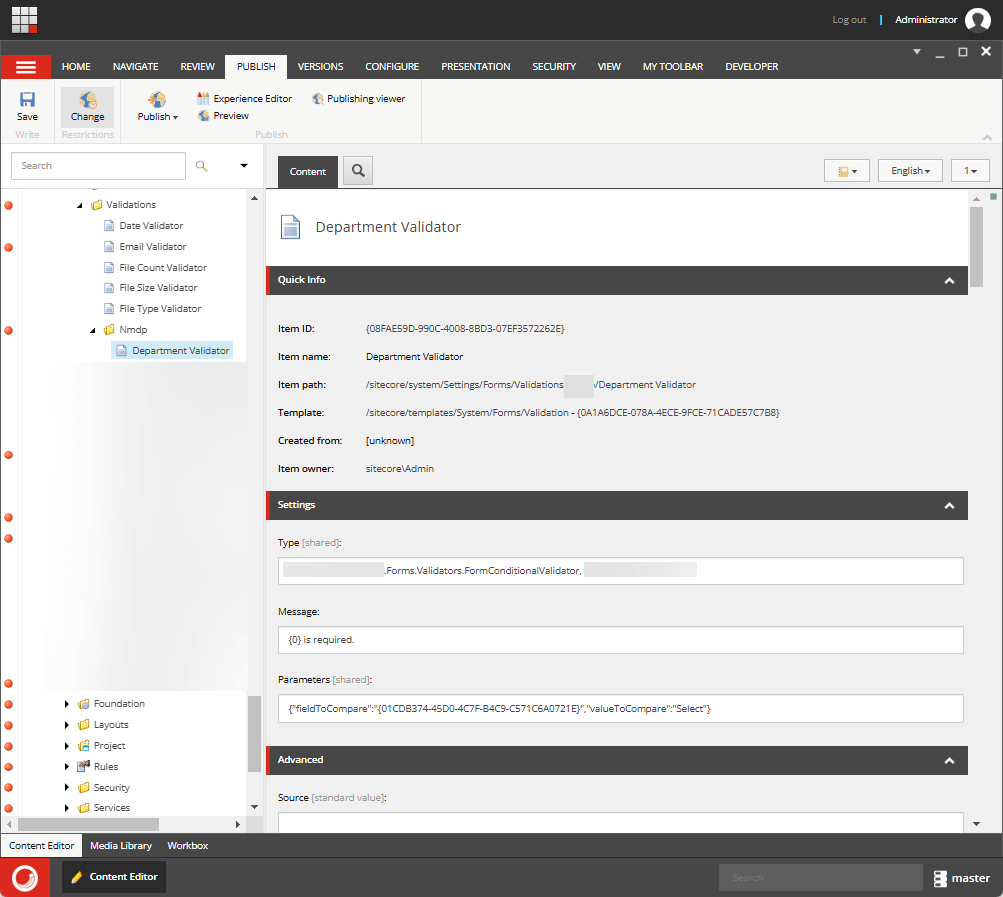
Open Sitecore Content Editor and navigate to: /sitecore/system/Settings/Forms/Validation
Create a new validation item:
Name: Department Validator (Change it according to Project needs)
Type: Reference the class you created, e.g., Custom.Validators.DropdownDefaultValueValidator, CustomAssembly
I came across a requirement from a client that they wanted to show Country and it’s states grouped in a dropownlist. I created a custom grouped dropdown to fit into the scenario. Since this is an extension of dropdownlist, no speak knowledge required.
Let’s get started
Step 1: Create custom dropdown list
Create a custom dropdownlist under /sitecore/system/Settings/Forms/Field Types/Lists based on Field Type(/sitecore/templates/System/Forms/Field Type) template like below
Step 2: Create a code behind class and razor view
create a code behind class like this in VS project
using System.Collections.Generic;
using Sitecore.Data.Items;
using Sitecore.Diagnostics;
using Sitecore.ExperienceForms.Mvc.Models.Fields;

namespace Sitecore.Project.Example.Views.StateDropdown
{
	public class StateDropdown : DropDownListViewModel
	{
		protected override void InitItemProperties(Item item)
		{
			Assert.ArgumentNotNull(item, nameof(item));
			base.InitItemProperties(item);
		}

		protected override void UpdateItemFields(Item item)
		{
			Assert.ArgumentNotNull(item, nameof(item));
			base.UpdateItemFields(item);
		}

		public Dictionary<string, Dictionary<string, string>> Regions()
		{
			if(string.IsNullOrEmpty(DataSource)) return new Dictionary<string, Dictionary<string, string>>();
			Dictionary<string, Dictionary<string, string>> counrtyCollection = new Dictionary<string, Dictionary<string, string>>();
			Item item = Context.Database.GetItem(DataSource);
			var children = item.GetChildren();
			foreach (Item child in children)
			{
				counrtyCollection.Add(child.Fields["Name"].Value, new Dictionary<string, string>());
				foreach (Item desc in child.Children)
				{
					counrtyCollection[child.Fields["Name"].Value].Add(desc.Fields["Name"].Value, desc.Fields["Code"].Value);
				}
			}
			return counrtyCollection;
		}
	}
}
Create a razor view like this and build project
@using Sitecore.ExperienceForms.Mvc.Html
@model Sitecore.Project.Example.Views.StateDropdown.StateDropdown
@{
	var regions = Model.Regions();
}
<label for="@Html.IdFor(m => Model.Value)" class="@Model.LabelCssClass">@Html.DisplayTextFor(t => Model.Title)</label>
<select id="@Html.IdFor(m => Model.Value)" data-trigger name="@Html.NameFor(m => Model.Value)" class="@Model.CssClass" placeholder="Select Your Work Location" data-sc-tracking="@Model.IsTrackingEnabled" data-sc-field-name="@Model.Name" @Html.GenerateUnobtrusiveValidationAttributes(m => m.Value)>
	<option placeholder>Select Your Work Location</option>
	@foreach (var region in regions)
	{
		<optGroup data-id="@region.Value" label="@region.Key">
			@foreach (var state in region.Value)
			{
				<option value="@state.Value">@state.Key</option>
			}
		</optGroup>
	}
</select>
@Html.ValidationMessageFor(m => Model.Value)
Step 3: Fill out the fields
Fill out the View Path, Model Type and Property Editor(should be Property Editor Settings/DropDown List).
you are now all set to utilize the custom dropdown list in Forms Designer. Don’t forget to publish the field!
Hope this is helpful. Any questions, please leave a comment.
I came across a scenario where i implemented a custom validation on Sitecore 9 Forms. Sharing my knowledge here. You can achieve this in three simple steps.
Step 1: Create custom validator
Create a custom validator under /sitecore/system/settings/forms/validation based on Validation(sitecore/templates/System/Forms/Validation) template like below
Step 2: Fill out the fields
Fill out your own regex and error message. You can copy the Type value from other validator.
Step 3: Assign the custom validator
You can now add the new custom validator to any Form fields( /sitecore/system/Settings/Forms/Field Types). All set and no code required!
Hope you found this blog helpful. Any questions, please leave a comment.